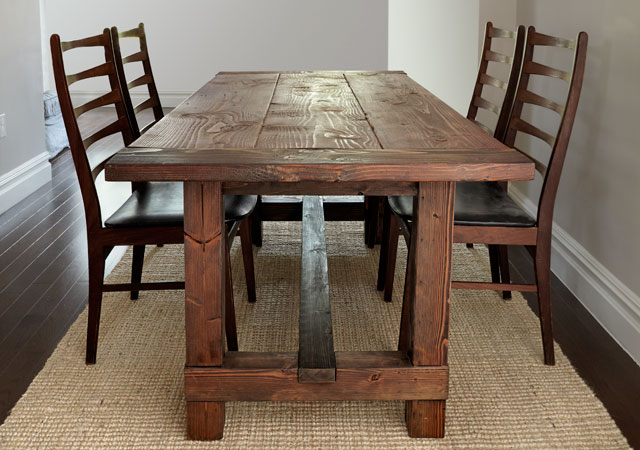
There’s no better way to give thanks than to gather family and friends around an enormous table to share a feast. A farmhouse table would be the perfect spot. You could make one out of construction lumber and ordinary hardware in a couple of days. We’re not talking precision woodworking here. If you can handle a circular saw and a chisel, you can do this. Farmers used to build these tables themselves, not furniture makers or carpenters, so it’s okay if it turns out a bit rustic. That’s half the fun. The other half is sitting down to eat at a table you built yourself.
Materials
| PART | DESCRIPTION | QTY. | LUMBER | LENGTH |
| A | Tabletop piece | 3 | 2″ x 12″ | 61″ |
| B | Breadboard end | 2 | 2″ x 6″ | 34″ |
| C | Leg | 4 | 4″ x 4″ | 28½” |
| D | Short stretcher | 2 | 4″ x 4″ | 26″ |
| E | Long stretcher | 1 | 2″ x 4″ | 56½” |
| F | Short apron | 2 | 2″ x 4″ | 18¾” |
| G | Long apron | 2 | 2″ x 4″ | 49″ |
STEP 1: Prep Your Lumber
Construction lumber has a higher moisture content than the wood used to build furniture, so after purchasing it, let it sit around inside your house for several weeks to dry out a little.
To start, you’ll want to cut out the pieces. Crosscut the top pieces, breadboard ends, stretchers, and legs. Note that the breadboard ends are slightly wider than the tabletop. This is a rustic detail with a practical aspect. It will allow the top to expand and contract with humidity and never be wider than the breadboard ends. There is also a slight overhang on the stretchers, for a similar reason. When you cut the legs, double-check that the length is a good fit for your dining-room chairs, especially if any of them have arms. Chairs with arms should be able to easily slide under the table’s aprons.
Crosscut both short aprons but don’t cut the long aprons yet. You’ll measure those after joining the legs and stretchers.
TIP: When buying lumber for furniture, even if it’s construction-grade, you may have to cut the best piece from a larger hunk of wood. After you choose the lumber from the stack, use chalk to mark the outline of the board you want. Then remove the excess. Yes, this results in more waste, but your finished product will look better for it.
STEP 2: Create the Base
To start, make a base assembly out of the aprons, legs, and stretchers. Attach one leg on either side of one of the short aprons. Bore two holes for pocket screws into each side of the apron’s back, four in total (fig. 1). Clamp the legs to the apron, but add a ⅛-inch piece of wood to the front as a spacer (fig. 2). This will offset the face of the apron from the face of the leg, pushing it back a bit and creating a nice dimensionality. Drive the pocket screws through the apron into the leg. Repeat the same procedure for the second leg–apron assembly.

(Illustrations by George Retseck)
You’re going to connect the two leg–apron assemblies to the stretchers using cross lap joints. These are among the easiest and most forgiving of wood joints to make, and they’re also quite sturdy. Mark the joint positions on the legs and stretchers. Start the half-lap joints on the legs by notching the two outside lines with a circular saw set to a depth of 1½ inches. Guide the saw using a triangular rafter square. Between the two outside cuts make a series of relief cuts spaced ⅛ inch apart (fig. 3). Then use a sharp chisel to chop away the waste (fig. 4). When you cut the half-lap joints on the short stretcher, set the saw’s depth to 1⅜ inches deep. This will make the stretcher extend ⅝ inch past the surface of the leg when the table is finally assembled. The offset will give you a table that looks like it was built by a farmer rather than by West Elm. It’ll look nice.

Before connecting the pieces, follow the same procedure to cut a 3½-inch-wide x 1⅜-inch-deep notch in the middle of each short stretcher. This is where the long stretcher will sit.
Spread glue on the notched face of the short stretcher and the notched face of the leg, and press the pieces together. Make a counterbored hole through the leg’s back and into the stretcher. Drive a 2½-inch coarse-thread pocket screw through the leg into the stretcher to lock the pieces together. To hide the hole, glue a dowel into it, trim it flush with a chisel, and sand it smooth.
STEP 3: Assemble
Glue the long stretcher into its notches on the short stretchers, and check that the two leg sub assemblies are standing square to it. Counterbore screw holes in the long stretcher’s end, and drive the screws to fasten it. Now measure and crosscut the long aprons. Join the long aprons to the leg subassemblies using pocket screws.
To make the top, align the three pieces of 2 x 12. Fit them as tightly together as you can. Bore four pocket-screw holes through the bottom faces of the top pieces, then spread glue on each adjoining edge. With the pieces clamped together so that the ends are flush, fasten with 2½-inch pocket screws. Glue will squeeze out of the joint. Wait a few minutes for the glue to get rubbery, then shave it off with a sharp chisel. Keep the top flat as it dries—I like to clamp cauls across both ends to add stability. Cauls are 2 x 4s or other pieces of stout wood turned on their edges.
It’s important that the ends of the top are straight and square. If the top shifts as the glue dries, trim it with a saw, using the breadboard ends as a guide.
Use a doweling jig to bore holes in the ends of the tabletop and on one side of each breadboard piece. After test-fitting the breadboard ends, spread a little glue on the dowels, attach the ends, then use three ratchet-strap clamps to apply pressure as the glue dries.
Next, use right-angle brackets to mount the tabletop to the base. Elongate the bracket holes in the top a bit to allow for the wood to expand and contract with changes in humidity.
Sand the table smooth. Start with 80-grit paper, and move to a finer grit for each pass. You should end with 220-grit. I finished the table with two coats of Jacobean-tinted polyurethane, then buffed on a couple of coats of wax after it was dry. The dark tint hides any scratches or nicks and also makes it look like it was built a century ago. On that note, you can give up your coasters—a little wear will only make your table look better.

TIP: If you like our table but want something that looks a little more polished, just expand the finishing step. Start by sanding carefully and thoroughly, then apply a pre-stain wood conditioner. This will highlight the wood’s grain and prevent the stain from absorbing unevenly. Apply your chosen finish in thin coats, carefully sanding out each coat and removing the sanding dust with a tack cloth before applying the next one. Finish the table with a coat of wax. There, now it’s shiny.
SKILL OF THE MONTH: How to Cut a 4 x 4
If you have a 10-inch miter saw, you can chop 4 x 4s to the required length in a single cut. If you have a smaller saw or a circular saw, you’ll need to make several passes. Use a rafter square to mark a cut line around all four sides of your wood. Place a 36- or 40-tooth blade in your circular saw, then make your first cut a little more than halfway through the wood. Rotate the lumber toward you 90 degrees, and use the first cut to start your next one. Continue around the wood until you’ve sliced through. As you finish, support the waste piece so it doesn’t break away unevenly and give you a jagged edge.
Join us on :
Facebook Twitter
Save Your Money and Time